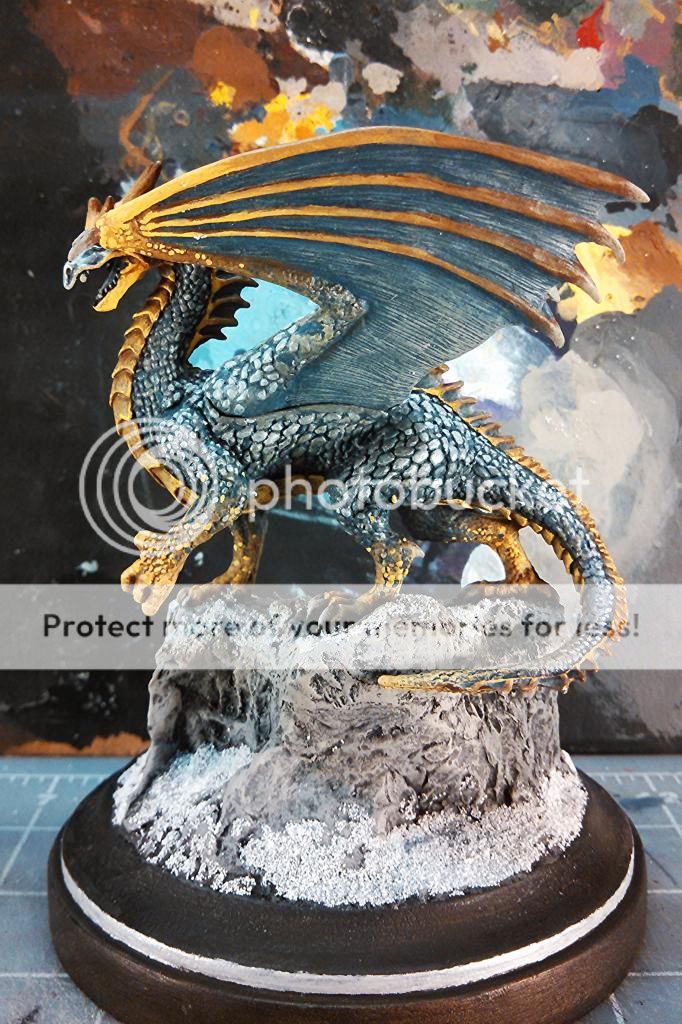
In an effort to populate my ebay store with Holiday Merchandise, I've picked up a few dragons to paint. The first one is Reaper's Bones Miniature of a Fire Dragon (77109). As you can see, I did not paint this one as a "Fire Dragon", but rather a Silver Dragon. It was a clear choice after referencing this wiki. This lovely dragon model was sculpted by Sandra Garrity and now painted by yours truly!
First things first. According to that wiki, a 5e Silver Dragon has two claws coming from the wing. To conform to this standard I took the claw on the wing of the Fire Dragon, and split it in half. Presto! Two claws per wing! Once I was done mutilating the miniature, I base layered the fella with twilight blue for all the silvery areas and brown for all the yellowy areas.
Teh Color Scheme
Body: Based with Twilight Blue, Then dry brush layered from Stone Grey to Polished Silver. Highlighted with Polished Silver.
Belly, Claws and Spines: Based with earth brown, the drybrushed with a dull yellow and washed again with earth brown. I then Highlighted it with more of the dull yellow.
Membranes: Based with Twilight Blue, and highlighted with Aged Bone.
Claws: Based with Earth Brown and the drybrushed and highlighted with Aged Bone.
If you would like to watch how I did each section of this miniature, you can check out the raw video from my live stream:
In part two of this series, I showed how I created the custom base for this piece. About an hour of stamping some fast acting epoxy putty with a rock later and we have a great basis for a custom base! I finished the stonework with a moderate dry brushing of Stone Grey and highlighting of Aged Bone.
Checkerout!
If you would by chance like to purchase this collectable piece, I have started an auction on ebay just in time for the holidays! You can check that out here! Happy bidding!
I looked and looked for the name of the sculptor for this one. Alas, no dice. This one for me was a commission piece. I was asked to paint him up as a white slug with green poison spittle! I am always happy to breath some new life into some old miniatures.
The paint scheme is comprised of two color gradients mainly.
For the skin, start with a base coat of dark brown. Follow it up with a dry brushing of pure white to establish the gradient. As a general rule shadowed areas should remain brownish to help create a sense of depth.
For all things poisonous I went with a base coat of leaf green. To give it that poisonous and puss-look I added golden blonde to establish this color gradient and as a highlight.
The underside was based brown and then highlighted with a mix of brown and golden blonde.
The eyes are a base coat of golden blonde with a dot of leaf green.
Note how the pure white and leaf green nodules on the back really give this paint scheme some character. I also added some leaf green veins to the floppy spines on its back.
This paint scheme is a prime example of how to paint a quality job without 17 different colors. Try your best to keep your color palette contained. I used a total of 4 colors to paint this miniature. It makes it easier to find 4 colors that will match, than it is to find 17 that match.
I am going to start doing some short posts every day or so to keep an account and review of the miniatures I have worked on. In each quick post I will share with you how I approached the paint scheme and other resources.
So in this first blurble lets take a look at Reaper's Frost Worm. This miniature was modeled by Kevin Williams. I always start out the same. I frost the figure. This is just a dark primer (or base coat) with a uniform and indiscriminate dry-brushing of the miniature. However, Since this Frost Wyrm is going to be primarily painted white, I toyed with a moderate drybrushing of purple. This will give great color contrast between the scales and the skin.
When I approach a paint scheme, I look for common features on the figure. I then assign a color pattern that will hopefully match. This scheme was obvious. Use cold colors. The blues and purples with make this white look cold!
The scales, carapace, beard and legs were painted white. I then applied a purple wash. After that dried, I drybrushed these areas with white again.
The belly was drybrushed with a light sky blue. I then lightly drybrushed the scales along the back that were closest to the belly and the beard. I wanted a nice smooth color gradient from light blue to white. After a quick highlight with light LIGHT blue, the body looked like ice!
The bony bits and eyes where all base layered with black and drybrushed with light blue.
Finally the skin on the fins had to follow suit with the skin. I based them with purple and then added a light white to the purple to create that stretched skin look. Easy on the paint here!
Time for pics! Checkerout!
This was commission was painted with a value-priced quote. As such, I did not spend days on it as much as I wanted. I did end up going back and touching him up before mailing him out. Also, I painted this guy without the camera in my face for once. So I am sorry but I got no clip for him either.
Anywho...
This was a lovely miniature to paint. I will definitely paint it again! Though next time we'll shoot for showroom quality!
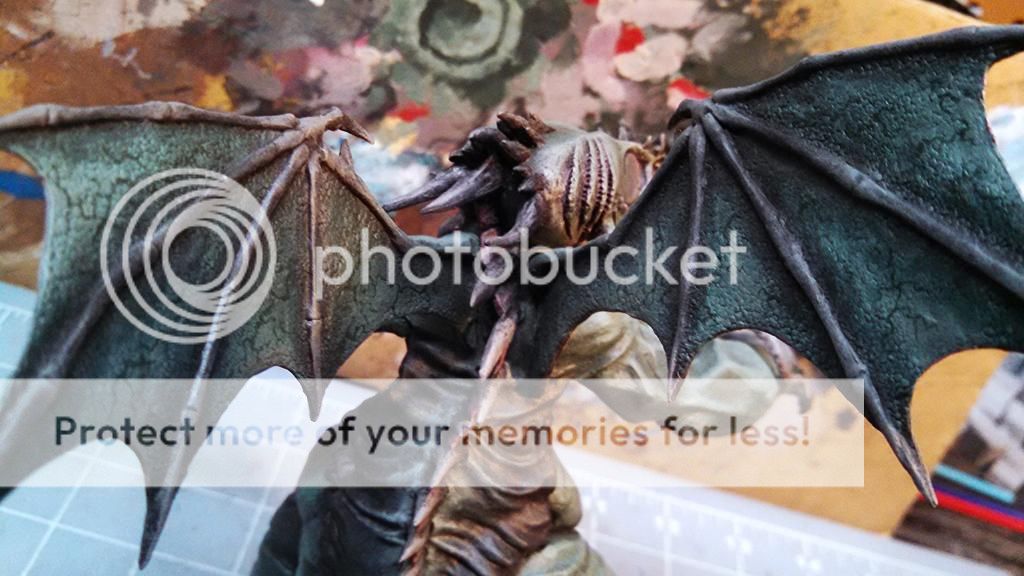
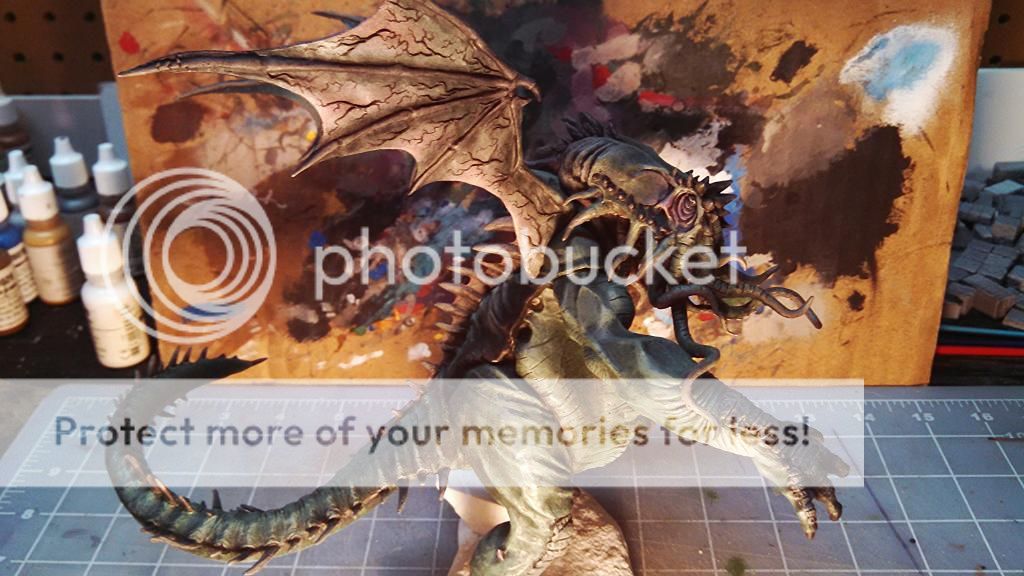
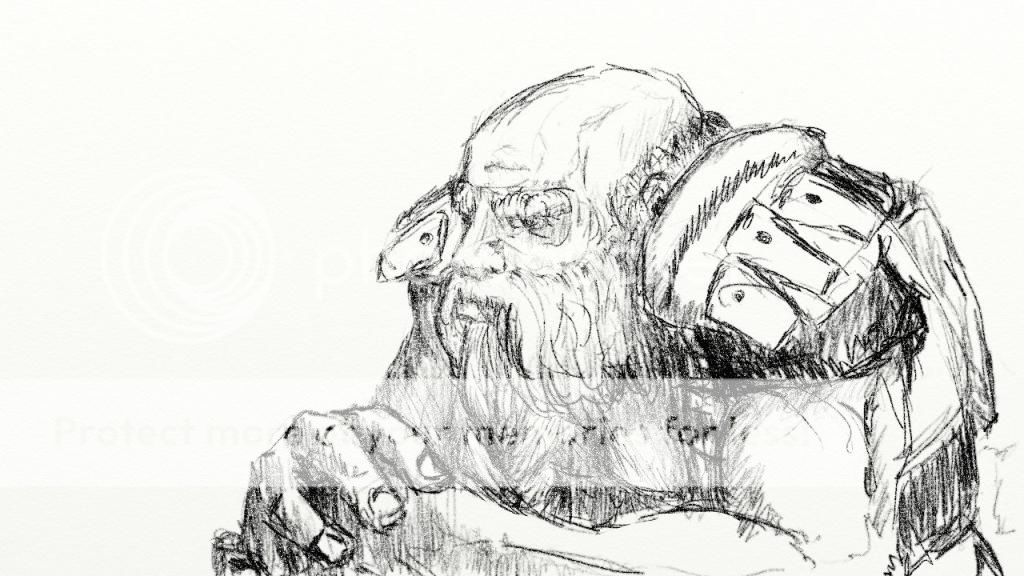
Please don't quote me if I am wrong, but if I'm not mistaken "Fhtagn" means "Waits". If for some reason you have found yourself here completely randomly, this fellow here is a little Ancient One we love to call... C'thulhu! (Did you get that there? call? Hilarious!) Don't get too excited yet. Hold it in. He ain't finished yet. Hence the title. Wait.
Now I am not a huge Lovecraft fan. I am ashamed to say I have never even read one of the short stories. I will insert my disclaimer here so I can get my apologies out of the way now. I am sorry if I butcher anything but english grammar in this post. I did however consult with a Mister Joke-Boy, a fanatic about my ideas for the paint scheme. He is also the one who will be running our single Call if C'thulhu session in the coming months. He also tells me that aside from the tail and claws, this model is pretty darn accurate. My source claims that he has never read anything that describes C'thulhu with a tail. He also thought the claws could have been a little longer. This particular model is produced by Reaper Miniatures in bonesium and was sculpted by a very talented Kevin Williams. While I respect the quality and accuracy of his work. I may end up doing a nail extension before I'm through.
By now you are wondering why I am starting another project when I already have 63 other projects on going. Me too. Rest assured and sleep well at night. Nothing is on the back burner here. I am hoping to go all out with this so called miniature. Incredible detail. Amazing base. I am even thinking of installing a light to that amazing base. Up until now, I have always posted my work to ebay with a price. I am considering putting this one up for auction. I want to know if I am selling myself short.
I started off like I do with all my bonesium minis, with a base coat of a dark color. In this case, that would be pure black. After I lay down that first coat, I tend to lay one more thick drybrushed layer down. This layer I usually mix in the base color with the color I chose first. In this case, it was a dark green. I then give the piece a few pulses of ultra flat matte sealant. You can apply paint directly to bonesium miniatures. However, the first layers can and do rub off on high traffic areas. I let the paint and sealer set at least overnight. Even though it looks dry, it may not have set yet. As you can see You'll still have issues, no matter how much you try and prevent it. If you know a better result, I would love to hear of it.
The paint scheme is composed of hide areas, boney areas and fleshy areas. The hide is a soft color gradient from a dark green to a pale lichen highlight. The boney areas are layered with pure black, and then lightly dry brushed with dark green,and highlighted with the same pale lichen. The flesh is layered with stone grey, and then dry brushed with a mix of blood red and stone grey. I then highlight the flesh with a mix between aged bone and blood red. If you would like to see how I blended it all together you can check out these raw video captures from the livestream broadcasts.
In case you were waiting for the punchline, here are some milestone pics!
So what else is left to do?
I would like to add some natural detailing to the hide. I am pouring over pictures of octopus, cuttlefish and squid as we speak. I am not sure what detail I will go with, but the pattern will be based layered with stone grey.
As stated before, I would love to do something special with the base. I am still toying with some ideas. If you have any, feel free to share!
If you have been following me, you'll know that we have a new campaign starting up using the Valentia role playing system. There is so much to be done here, and so little time to do it. This project must be completed by the 17th of October. I am counting down the days, but I am confident I can pull it off.
The campaign takes place in a city which is under occupation. We the players will be charged with organizing the resistance! Each player picked their miniature (I'm playing a dwarf merchant who happens to be very adept at wrestling). For the invading army, I chose to go with the Overlords from Reaper's Warlord line. This way they will all be sure to match.
I will be livestreaming much of these pieces except for all the infantry. I will however be taking photos of everything, so no worries there. For now, let's take a look at whats on my plate...
I'm a fan of Reaper Miniatures. They got a wide selection and I don't have to order from twenty different places to get what I need. I have included product codes for everything I am showing in case you care about that sort of thing!
the Cast of Player Characters
From left to right we have: 03276 harrix Firblood 60015 Kyra, Female Inconic cleric 02883 Sir Kimball Crusader P02559B Brewmaster
the Cast of NPC's
From left to right: 77084 townsfolk Innkeeper 77086 townsfolk: Strumpet 77085 townsfolk: wench
From left to right: P06149B 14147 Andras Overlords Captain P06149C P06149A note these come with P06149D sprue of shields
From left to right: P06148C P06148A P06148B
From left to right: P06147A P06147C + P06147E P06147B
Last, but certainly not least we have a couple custom jobs. The invading army has Wyvern Riders I guess. So I am gonna saddle these Blackstings up and throw a rider on them.
02636 Blacksting, wyvern P14258B The Count + his sprue P14258C
Upon starting this whole live streaming tabletop RPG gig, I wanted the scenic stuff. Having miniatures helps, but having proper miniatures painted up all nice purdy changes the game. Now, having proper scenic bits WITH miniatures... oh my... what fun!
I have never done the scenic stuff before, so this is something totally new for me. At first I tried out some paper-crafting. What a pain in the butt. Hours upon hours of cutting paper stock, cutting foam board and gluing it all together. My time was better spent painting and flipping minis than trying to find the cheapest good quality ink to print this stuff off. Speaking of costs, it ain't as cheap as what you think it is.
If you watch some of my earlier Archivo Deorum videos, some of you will notice I went with WWG's terralinx line. It is really nice looking stuff. That's why when I decided to go a different route for modular gaming tiles, I looked there again first. I wanted to drop some cash on their terraclips line. Turns out its all out of print (I told you I was new at this scenic stuff.), and the set I wanted was the most sought after. Of course it was... What's a tabletop geek to do...
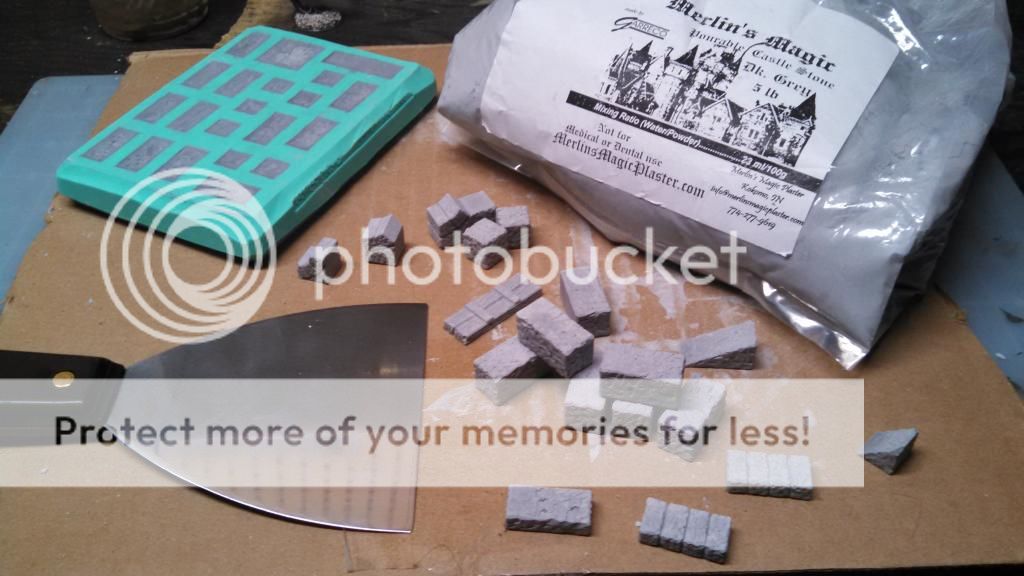
After much soul searching and internet tears later, I found some nice buildings people were making from plaster molds made by a fella named Hirst. I thought, "I'm not a dumby, I can do that." Its a phrase I say often. So I did it. I bought a couple molds from HirstArts, some proper plaster from the folks over at Merlins' Magic Plaster and a putty knife.
For a considerable investment, you can get some quality scenic stuff by going this route. The building I am working on will end up taking about 10 pounds of plaster to fully cast using 5 different molds. Your first building will be the most expensive part of the investment. Now you don't need 5 molds to make a building. I happen to need a mold for flooring, one for rooftops, one for walls, and a couple for props.
If you do it like me, all smart like... your first building will also be your second, third and fourth building. I like things to be modular, because I can get the most for the monetary and time investment that I put into it. For me, it was a must. I am still in the experimental stage, so stay tuned. when I finished said "first building" I will make a dedicated post for how I did it.
Mini's ordered. Hobby Stone ordered. Molds Ready. MiniGrinder is pooping bricks this week...
So next weekend is the first session of the new campaign that I am co-producing. My brother and Head Designer of our d20 system Valentia Role Playing System, will be directing as GM. I will be handling set design and post production work. I am really excited to start this project. There is so much to do, and yet so little time to do it.
The plan is to produce a weekly short video out of our sessions. Unlike what I've done with Archivo Deorum, we will not be broadcasting this campaign live. This will allow me to throw in all the bells and whistles after the fact. I am even going to experiment with using a green screen to add in animated backgrounds and other special effects.
This campaign will take place primarily in a city. Up until now, I was using papercrafting to build all my structures. That's all about to change. I will now be using molds from Hirst Arts to help the tabletop's dimension of the third kind. I will be constructing these buildings from molds, and painting them. The objective here is to build these buildings in the most modular way possible. Stay tuned to my MiniGrinder Paints Live series on my youtube channel for sneak peeks of what I am working on for this campaign.
For each encounter, I would like to produce an original piece of art depicting the scene, or maybe where the scene takes place. Other original artwork will include stuff like maps and images of special items, graphic overlays and character profiles.
Much of the tabletop will be captured in still frames and broken down into layers, allowing me to "animate" the still images using a parallaxing technique. The old 720p webcam I use for everything now, will be used primarily for capturing an overhead view of the tabletop.
When it is all edited down and polished, what we will have is something akin to an animated graphic novel. However, as we all know the story will be written dynamically through the dice rolls. Because that's how tabletop RPG's work damn it! So now you can see why I am so excited about this project! Its going to be the ultimate tabletop fantasy!
Now all I need to do is learn how to do half the stuff I mentioned... I'm only one person. Do not expect to see a finished product for months after we film the adventure. Once I have a trailer for the series put together I will probably put together a Kickstarter campaign to help turn this project up to eleven! I have been funding this all by painting miniatures and putting them up on ebay. If you would like to donate to this project. You can start by visiting my ebay profile page. Any miniature you purchase will help me put together the best god damned fantasy tabletop rpg adventure..... ever.... Well, we'll see...